
We have all heard the phrase "there is an App for everything". Etsy is no exception. Here are some of the Apps created to help with navigating through the website with one touch. Check them out and see if one is right for you!
Resin Chica!
Sunday, January 31, 2010
What is wrong with my resin jewelry pieces?
So you have mixed and poured your resin mix into molds and you even took the time to embed some objects. You use the tweezers to rearrange some of the decals in the resin and step back to admire your hard work. All done right? Wrong. Something that most people so not know is that working with resin is actually pretty tricky. Its not rocket science, but it does require some finesse. So why should you really have to wait the suggested 24 hours for your resin to set and to pop our your pieces? Here are 2 BIG problems you will encounter due to your impatience...trust me, I speak from personal impatient experience!
1.) Piece will not pop out of tray (this should happen easily)
2.) Piece is still tacky or sticky to the touch once removed and will be ruined
Here are some possible explanations for when your resin pieces come out "less then perfect"
Resin Chica Tip: When waiting out your 24 hours for resin to cure, make sure to place molds on a surface that is flat and even, and use large tupperware containers to place upside down over the molds to prevent anything from falling in the resin and becoming permanent. Dust would not be very pretty in resin.
Resin Chica
1.) Piece will not pop out of tray (this should happen easily)
2.) Piece is still tacky or sticky to the touch once removed and will be ruined
Here are some possible explanations for when your resin pieces come out "less then perfect"
- Resin is sticky or tacky- You most likely did not measure properly or mix the 2 part system (when using epoxy resin) completely
- Embedded decal changes color or becomes translucent- You most likely failed to seal (I suggest Mod Podge) prior to embedding.
- There are tons of tiny bubbles- This is a temperature problem and the resin was too cold when mixed.
- You are not able to get the pieces out of mold- Many molds need to be treated with release spray (I spray some on all my molds regardless) or the resin has not been able to cure long enough.
- There are bubbles under the embedded item- Make sure to brush the item with resin prior to embedding and use tweezers or a toothpick to gently push out any bubbles from under the piece.
Resin Chica Tip: When waiting out your 24 hours for resin to cure, make sure to place molds on a surface that is flat and even, and use large tupperware containers to place upside down over the molds to prevent anything from falling in the resin and becoming permanent. Dust would not be very pretty in resin.
Resin Chica
Check ths out!
So I was working on a whole set of new rings and started looking online for inspiration. I will go online and look at random things that lead me to other random things and before you know it I get an idea from a painted pig or some bright wallpaper listed for sale on ebay! Anyway, here is a cool link that had me mesmerized with tons of info and great articles on all kinds of crafts! Just thought I might share! Enjoy!
Resin Chica
http://www.craftcritique.com/
Resin Chica
http://www.craftcritique.com/
Thursday, January 28, 2010
what is happening?!
Working on etsy account and getting some cool tutorials up soon! My computer is really bugging me and does not like my new camera!
Sunday, January 24, 2010
Loteria!

Check out the Loteria fabric! I am excited to work with this! Send me your pics if you have any cool ideas of things to do with Loteria paper or Fabric! I am interested in hear about it! Check it out!
LOTERIA FABRIC!
Friday, January 22, 2010
Some inspiration...

Items in this set:
LEAVENWORTH DRESS, 64,050 JPY
pink platforms
DKNY Crocodile-effect leather purse, $65
Patsy Purple Quatrz Cocktail Ring by Lola Rose, 33 GBP
MAC Dazzleglass lipgloss (salvsnena), $18
LEAVENWORTH DRESS, 64,050 JPY
pink platforms
DKNY Crocodile-effect leather purse, $65
Patsy Purple Quatrz Cocktail Ring by Lola Rose, 33 GBP
MAC Dazzleglass lipgloss (salvsnena), $18
What the heck is Mod Podge?

I was asking this exact same thing when I first started embedding objects, particularly paper, inside of resin. I would see sooooo many tutorials that instructed me to use Mod Podge to seal the artwork from having the resin sink into the item and create an undesirable transparent affect among other messy outcomes...
So I was thinking...at the time...what the heck is the big deal about this stuff? When I first started with resin I went to the Texas Art Supply store to pick up some Easy Cast and saw the very retro labeled stuff on the shelf. I figured since I was planning to working on embedding some pictures of my kiddos in some cool charms, I should get some to seal the prints. I had noooo idea there were sooo many different kinds!! There is Mod Podge Classic, Hardcoat, Fabric, Outdoor, Satin, and Sparkle!
I found this site that helps outline what the difference and thought it might be helpful for you!
http://www.plaidonline.com/apmp.asp#ModPodgeBrands
Check it out!
Wednesday, January 20, 2010
Soooo not cool!
I have actually been too busy to post and update my blog with any new projects...that is partially because...I have not been able to start any new projects! ahhhhh!!! I am currently in the process of ordering some materials to finish these really awesome rings I have been working on...pics and more information should be posted by the end of the week!
Saturday, January 9, 2010
its shiney! Mold trays!
What do you use to create the shapes and designs of the funky resin pieces?
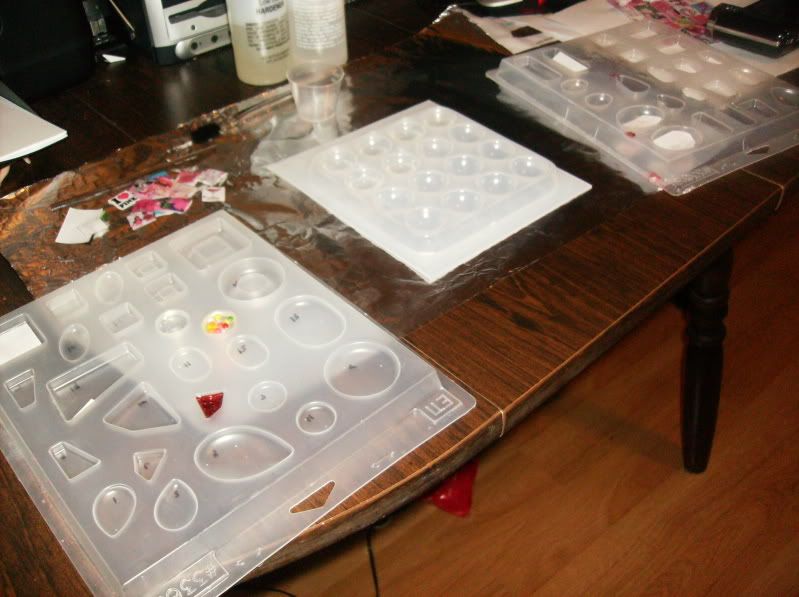
I began by using the standard mold trays that you can buy at any craft store. They are made by Castin Craft and are super easy to use. http://www.kitkraft.biz/product.php?productid=6775
Intructions- make sure to protect work area with wax paper (or similar paper).
Although these are easy to use, they do not allow for much creativity, but are a GREAT beginners tool.
Happy Molding - Resin Chica

I began by using the standard mold trays that you can buy at any craft store. They are made by Castin Craft and are super easy to use. http://www.kitkraft.biz/product.php?productid=6775
Intructions- make sure to protect work area with wax paper (or similar paper).
- Spray with MOLD RELEASE
- Place mold tray on level surface.
- Fill mold cavities just below top.
- Place tray in sturdy spot where it will not be moved or jerked.
- Place cover over tray to prevent dust and/or particles from getting in mold (tupperware upside down- my preference)
- Once pieces are cured (I like to wait 24 hours), turn tray over and press center area of each piece to release, flex if necessary.
Although these are easy to use, they do not allow for much creativity, but are a GREAT beginners tool.
Happy Molding - Resin Chica
Friday, January 8, 2010
Officially a "Latina Blogger"
Whooo hooo! I have a new favorite blog spot! I am actually not sure how I came about http://www.blogsbylatinas.com/ but I was inspired by it and hope you are too! Just wanted to share that they approved my blog as one of their "members" yay!
Resinchica will grow...slowly...but surely...and with quality. :)

Resinchica will grow...slowly...but surely...and with quality. :)
Monday, January 4, 2010
my creations...
So...I "sealed" some icon images in decoupage that totally did not work...once I placed the images into the resin, the images were quickly messed up with patches of translucency from the resin. I have heard that Mod Podge is the best option. Since I do not have Mod Podge, I used Decoupage glue to seal in the image the day before even placing the item in the resin. Following the image embedding, I added a final layer of awesome bright pink glitter as the background. This camouflaged the decoupage mistake a little bit...but I am afraid not enough...oh well maybe I can use them for the HUGE window decorating I have in mind...more to come soon.
Saturday, January 2, 2010
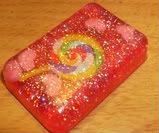
too bad you cant eat it!
I always plan out my resin pieces in my mind before I even begin mixing the resin, but some of my best pieces are the ones that are by pure accident. Many of my favorite pieces are the result of me using the remaining drips of resin in the cup to fill the final mold cavities. I find myself adding all types of random pieces of candy and sticker decals that I had no original intention of using. Coincidentally it is these pieces that end up being my favorites! This pink one is an example of this "thorough process" I used real pink sugar sprinkles with fine glitter, then I added the decal, and lastly I dropped in the pink sugar sprinkle hearts (they were left over on the counter). Ta daaa!!

Subscribe to:
Comments (Atom)


