
I receive my order of 50 ring blanks yesterday! I cannot begin to tell you how many resin pieces that I have completed and are waiting to be attached to the ring. The rings blanks are the jewelry piece that I get before I attach the resin pieces. I will have tons of pics soon! I have never had this many to work on at once.
I actually use resin to attach the resin piece to the ring. Unfortunately, even though resin is super strong, it does not allow the flexibility needed for an adjustable ring. I realized that the resin as the adhesive works well for attaching some pieces, but that I would need something else to attach the resin to the rings.
More on that later...
Sunday, February 28, 2010
Friday, February 26, 2010
Rodeo time in Houston...

Check out my Jessica Simpson cowgirl boots! You like? The Houston Livestock and Rodeo is the largest in the world and it kicks off this weekend with the official Cookoff. The Friday before the rodeo starts is always "Go Texan" day here in Houston where we get to sport our rodeo wear to work, school, or wherever! Okay, so we Texans may still be little bit country...sure Houston is a major metropolitan city, but we have not lost the Texas twang completely! Those of us that are native Texans...never will! I will post the pics soon! Yeehaw yall!
And the winner is...
PiinkCupcakez blogger!!!
Sorry it took me so long to announce! I had to restart my computer!! URGH!!
The winner will receive a handmade resin adjustable band ring made with epoxy resin and real candy sprinkles with an overcoat of super fine glitter!
I will make contact with the winner! I will also announce next weeks "follower" giveaway this weekend!! Stay tuned! Thanks to everyone!
Resin Chica
Thursday, February 25, 2010

This week's Resin Giveaway!

Check out this ring! It is one of my favorite in this collection and there are more to come! All you have to do is be a blog "follower" to qualify for this week's giveaway! The winner will be selected at random and announced tomorrow at 10am central time!
I am going to try to announce the next giveaway this weekend! Stay tuned!
Good Luck!
Resin Chica
Wednesday, February 24, 2010
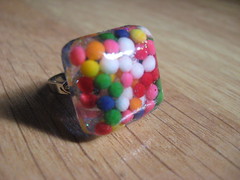
Want to win this ring?

Resin Chica will be doing a random drawing on Friday 2/27 for one lucky winner to receive this hand made resin REAL CANDY sprinkle glitter ring with adjustable band! All you have to do is be a Resin Chica blog "follower" to be eligible. As you can see we do not have millions of followers, so your chances are really good! What do you have to loose?! Plus if you are into crafts and similar projects you will get tons of great info on resin casting and other current craft trends. Become a Resin Chica follower today! Winner will be announced on Friday morning at 10am!!
Resin Chica
The completely unrelated to resin post
 I love sharing awesome creations from fellow etsy artists.
Check out this super cute pouch, that you can use for just about anything! It's brought to us by the hands of TheMistfitOwl on etsy! I love this one because of the cupcakes! Check it!
Resin Chica
Casting resin the ice resin way!

I usually write about casting epoxy resin. Lately, I have been seeing a whole lot about Ice Resin, so I decided to do a Resin Chica 101 and bring the info to you!
Ice resin- is a clear resin that is also used for projects involving jewelry and paper.
What makes this resin different from the easy cast resin that I use for my projects? I honestly have not noticed very many differences and my research has indicated the same. The conclusion I draw is that it is a matter of preference, but I am leaning toward the difference being the "ice" like texture and look of the ice resin. Hence "Ice" in ice resin. I have also heard that it may be less odorous and not as harmful of a chemical, but don't quote me.
I am going to be working on a project using ice resin soon and I will tell you first hand what differences I notice right off the back.
In the meantime, check out the mother of all information for ice resin- http://www.iceresin.com/ for more info and cool picks as to what you can do with resin casting specific to ice resin. Let me know if you try it out yourself!
Resin Chica- the Resinista of Resin
Monday, February 22, 2010
I still love you!
I have been working constantly on building my writing portfolio that my crafting, has taken a back seat for the past week. I ordered 50 ring backs for an entire batch of awesome rings to attach. I will take pics and share as soon as I get on it. I will have much more time on my hands really soon!
Resin Chica!
Resin Chica!
Tuesday, February 16, 2010
Ice resin! Last time!
I keep goofing this post up! Check out this video of working with Ice Resin! If you have worked with this before, please comment and share what you did. I would love to learn more!
--Resin Chica
http://www.youtube.com/watch?v=0AJ4vIptOQA
--Resin Chica
http://www.youtube.com/watch?v=0AJ4vIptOQA
Monday, February 15, 2010
Makes you want to lick your fingers...but don't!!

Pretty and shiney! I love the colors in this picture! I incorporated all of my favorites with this set of rings (they are attached to adjustable rings). This was a three stage curing process...yes lots of patience is necessary! Click on the pic if your are interested in having one on your finger! Please don't eat it! No matter how yummy they look!
--Resin Chica
Naked pictures in your window!
Love this! Super cute! It's a little out of my crafting league, but a great post non the least.
Check it out!
Check it out!
You can't eat them!
Check out my recent work. I just starting selling on etsy, so I have not had the opportunity to develop a reputation online or accumulate feedback. Either way, I love um!
SprinkleRings by Resin Chica!
SprinkleRings by Resin Chica!
Sunday, February 14, 2010

Saturday, February 13, 2010
My resin casting in process!

This is a picture from my latest project of resin candy sprinkle rings (blurry due to taken with phone)! The pieces have already been cured once, this photo was taken once I poped the pieces out and filled the backs with more resin mixed with glitter for a layering effect. I balance them on the same mold I used to make them...seems to work alright.
Soooo cute you will want to eat them! (please do not attempt!!) I am taking the remaining pics that I plan to post on etsy before the weekend is over! These are some of the best ones yet! When you are working with resin you will quickly see how much your technique will improve with the more and more you cast. You will pick up your own style to prevent spills, get rid of bubbles, and create even more beautiful pieces. Dont get frustrated if your first cast is a disaster! My first time casting resin, I waisted all of the resin because I mixed way more then I needed. Just stick with it and you too, will have some pretty awesome outcomes when you least expect it!
Hugs, kisses, and resin!
--Resin Chica
Wednesday, February 10, 2010
Resin casting embedding project

I am excited to share with you my favorite thing to do with resin! Embedding objects in resin! Have you ever seen something floating inside of clear material such as a paper weight and wondered how it got there? With a step by step process I am going to show you how to create a pendent with beads floating in the resin. I am going to make it as simple as possible.
Things you will need
- Protective goggles
- Gloves (I tend to use standard latex gloves)
- Wax paper for your surface
- Easy Cast resin
- Small mixing cups
- Stirrers (Popsicle sticks or coffee stirrers)
- Timer
- Pendant Mold
- Item to embed (in this case we are using about 5 small beads)
- Patience
Step 2-With gloves and glasses, mix Easy Cast resin. Follow instructions on package exactly. Make sure to follow the 1:1 ratio and make sure to make in small amounts (this varies on how many mold cavities you decide to fill at once)
Step 3- Once resin is fully mixed you have about 30 minutes to work with it before it starts to thicken. Fill in your pendant mold about half way full. You will notice small bubbles rising to the surface. This is normal. You can use a heat gun to hurry up the process or a toothpick.
Step 4- This is a tricky step because you want to leave the resin to thicken a bit, but not harden. This will involve some tooth picking to periodically test consistency. (you do not want to touch the mold with your finger unless you want fingerprints on the pendent)
Step 5-Once the resin has a jelly like consistency you are ready to add your small beads or whatever you decide to embed. I often times embed letter beads such as those shown in the picture.
Step 6- Make sure there are no bubbles beneath the item. Many times you will have to seal the items first before placing in the resin to prevent them from collecting bubbles or ruining the item. If you are using a porous item like a decal printed on paper, you will want to use a sealant. I prefer Mod Podge (follow directions)
Step 7- Pour in the rest of the resin fully covering small beads. The beads should be floating somewhere in the middle on top of the jelly like resin but beneath the newly poured resin.
Step 8- Let the resin cure for 24 hours (this is my suggestion) Depending on the temperature and a few other factors some only cure their resin for about 12 hours. Make sure to place the mold in a spot that will not be moved or shaken.
Step 9- Turn over mold and gently push to pop out resin piece. This should be fairly easy, but if you have problems and you have waited the full amount of curing time, try putting the mold in the freezer for a couple of minutes.
Step 10- You now have your resin piece ready to do whatever you want. You may find that the edges need to be sanded down a bit. You can do this with a foam nail file for small jobs such as the pendent.
Tuesday, February 2, 2010
Epoxy Resin Casting with everything under the moon!

When I first starting experimenting with epoxy resin, I would always hear that you could embed "anything" in resin. I would go online and try to find a general list of some examples but was still not able to find a good one or at least one for beginners. Here is the list that I wish I could have found when I first started.
Some things you can embed in resin
- Glitter
- Stickers
- Paper (make sure its sealed)
- Sand
- Beads
- Candy (my personal fav)
- Polymer clay pieces
- Dried Flower
- Insects (not my cup of tea)
- Seashells
- Rocks
- Thread
-Resin Chica
Subscribe to:
Posts (Atom)


