So what?

This is my blog where I showcase my handmade resin jewelry pieces and offer information and tips on great ways to work with resin. Please feel free to email me if you have questions!


Why Resin Chica? My absolute favorite material to work with is Resin because it is beautifully transparent, gets fussy when not taken good care of, particular, can be molded and changed to adapt, and will stubbornly stay put until it gets it's way. Only certain people can work well with Resin. I am Resin Chica. (Yes I am also Free2bMommy) Resin Chica is my Sasha Fierce!


Wednesday, July 28, 2010

How to order

Hello all!

I have received a few emails in regards to how to go about ordering a ring. Ring prices range from $10-$15 and all you need to do is email me at sprinklerings@gmail.com and let me know that you would like to order a ring. I will need to know a few things...here is what I will need from you.

1.) Please let me know what shape you would like for your ring. See pic below.

2.) I will need to know what you would like in the ring (the picture.) if you have seen something in my galleries that you like or a common logo, just let me know.

If you would like a special image, just attach a copy of the image on the email. I can use just about any image/picture for the rings.

3.) Glitter!! I work with a layer of clear resin followed by the image, then finished off with a large background layer that includes glitter. Check out the galleries for examples of what I mean. Just let me know the color glitter you would like for your background. If you want just clear/regular glitter, thats okay too. I of course have most of the colors...but not all.

I then will create an invoice and send you a link for payment via PayPal (the only method of payment I accept) if you do not have a paypal account they are really easy to set up and use.

I do not begin custom work, which is just about everything, without payment in advance.

I try to have the piece done in 1 week, but request 2 weeks.


Tuesday, June 15, 2010

Need ideas for embedding objects?

Just Press Play!

Friday, May 28, 2010

3 Video Updates!!!

Sorry that my voice does not match my lips! Urgh! I cannot seem to get it right!!


Wednesday, May 26, 2010

Where the F have I been?

Running Free2bMommy has taken up sooooo much of my time that I have suckingly neglected my resin chica blog! URGH! I may soon merge the two, because I am sooooo short on time to post to more then one blog.

This weekend I am working on Texans style rings for a friend of mine! I am super excited to get started and hope to buy freaking batteries for my camera and document the whole thing! I will share pics of the finished products.

I have been working a lot of photo resin embedding and have been having a ball with it! I am having some problems with tiny bubbles almost invisible to the naked eye, but there none the less. I will share those super soon too!

Resin Chica

Tuesday, May 4, 2010

Sorry I have totally sucked lately!

I know that it may seem like I have been sitting on my ass and doing nothing, but I promise that I have been working on tons of new rings and just not blogging about it! I know, again I suck!

I promise to share some of my newest creations soon.

I did want to express one concern- I have been having some trouble with the resin adhesive that I use to attach my resin piece to the ring blank. If you have any good suggestions for me, I would love to hear it!

Resin Chica!

Tuesday, April 20, 2010

Sorry!!

I accidentally deleted the videos! Here they are again. Urgh! I hate that I have like noooo makeup on!!! I also hate that I had some issues with sound and picture being in sync and the videos not fitting on the blog correctly! I am working on it.


Saturday, April 17, 2010

Feeling amazing!

I was included in one of my favorite blogs! PiinkCupcakez.com - The 411 on Everything Glam!

Thanks girlie!!

Here is the link to the post!

This blog is awesome and really fun to read, plus all the pink makes me Luuuuuv it even more!

One of my favorite things about her blog is the awesome pics of the "eyes" with the different styles and combos of eyeshadows! I could never get my eyes that perfect, but its fun to dream!

I have finally started selling on etsy! I was selling myself short, by doing all of my transactions off-line and was not able to build my reputation on etsy. I do not have a bunch listed on there yet, but will be adding a bunch over the weekend.

If I make a special piece for you, I will post it onto Esty for you to complete the transaction that way!

Thanks for all of the support!

Resin Chica

Sunday, April 11, 2010

How to "seal" your decals for embedding

There are many ways to embed decals in resin. Some artists choose to buy a certain type of paper to print on, others may use preprinted pre-coated decals. My method of preference is to print the decals or pictures straight from my own color printer and then seal the decals and embed them.

Why would I need to seal the decals? If you place ordinary porous paper into resin, the resin seeps straight through it, causing transparency and picture distortion. Not good. When you seal the decal, you are preventing any resin from touching the actual paper, by forming a protective barrier.

The basics to this are simple...
excuse the unmanicured nails!! Its hard to keep good nails when you craft often.

Supplies needed- paper, scissors, Mod Podge or similar sealant, wax paper, and sponge brush.

Step 1
Print your preferred picture of decal on your printer. I can only speak for an ink jet printer but I think it should work with most.

Step 2
Cut the decal down allowing a little bit of white space surrounding the decal. This helps working with the decal easier without so much extra paper. I usually do many to a page in rows and then I cut across each row. This makes many rectangular pieces of paper which are super easy to work with.

Step 3
On top of your wax paper apply first coat of Mod Podge to front of decal. I suggest the 1 inch sponge brush because I like the way it applies and they are cheap, you may choose to use a different type. There are different Mod Podge finishes but I use the matte finish because once added into the resin, the resin creates a brilliant and shiny effect all on its own. That is why I love it!

I usually paint across the pieces only with a few brushes then I leave it to dry. I will appear "white" at first, but if your brush it as thin and evenly as you can, it will dry clear. Make sure not to over do it with the first layer, you don't want to over saturate the paper creating a "ruffling" effect.


Step 4
Once the first side is dry, flip the decal over and apply the first coat to the back, then allow to dry.

Repeat Steps 3 and 4 one more time for maximum protection.
It takes about 5 minutes to dry per side. Make sure one side is dry before flipping.

Step 5
Once all layers have been applied and are dry, cut down the decals to eliminate the extra white space surrounding the decal. Many artist use transparency when working with elaborate decals to prevent over cutting or distorting the image.

Before embedding I usually brush one last light coat of Mod Podge along the edges.

You can see an added "step" to my personal decal prepping...I'm soooooo classy!!!

All of these steps usually help to protect the decal, but it will be very obvious should the sealing not work.
I hope this is helpful! Let me know!
Happy Sealing!

Resin Chica

Saturday, April 10, 2010

Decals for embedding

This weekend I am working on using printed logos/decals from my computer and sealing them to embed into rings.

I have received 3 special requests involving company logos or favorite sports teams. This is my favorite project yet. I love custom projects and the artistic freedom that comes with it. Many times people will just send me a picture via attachment and I work with it to shrink it down and print for the embedding process. Many people think that custom jobs are time consuming and boring. I think quite the opposite. I love when somone give me a piece of inspiration to go on and trusts me to create an awesome original piece.

I am experimenting more and more, with resin dyes and layering techniques, that are a little more advanced then I am use to. Once you reach a certain level of "expertise" with resin, you can not help but want to take it to the next level. The possibilities are endless and it seems like the projects just get bigger and bigger!

I am going to see if someone can help me get some pics while I prepare the logo decal rings, so that I can share them here!

Resin Chica

Friday, April 9, 2010

resin rings (41 photos), by Danielle Orozco


I'd like to share my Snapfish photos with you. Click here to view photos

Tuesday, March 23, 2010

Lots of pics to share...

In preparation of an upcoming event in May, I am working hard to build the inventory. Check out what I have been working on!


Resin Chica

Monday, March 22, 2010

Some bling bling...well sort of

Check out my latest batch of rings! I worked on these in 3 stages over the weekend whew! The pictures honestly do not do them any justice...not to too my own horn, but it is what it is right?


Resin Chica

Friday, March 19, 2010

These are a few of my favorite things...

Glitter makes a girl go crazy! I love using glitter in my rings and other projects I tackle. I will be working on some sets for the first time. Matching ring, bracelet, and maybe earrings. I will be donating a couple sets to different auctions, and I'm really excited about the project! I will however have to tone down the colors and amount of glitter I use, while attempting to appeal to the auction audience. Wish me luck! I will post pics, soon!!

Now I will be on my way to the kitchen to start stage 1 of some rings and 1 trial bracelet. Don't worry, I have a separate marble top counter where I do all of my resin casting, I also make sure to have the window open to ensure lots of ventilation. Remember...just because you don't necessarily smell the resin, does not mean that it's not there. I have to remind myself of that too. I also have to remind myself to always protect all surfaces I am working on. If the resin spills...it really spills! I does not come out of clothing!! I know from experience! Just take the extra step to cover everything and put on an apron or old t-shirt.


Resin Chica

Wednesday, March 17, 2010

St. Patty's double take!


Here are some of the rings that I made in honor of St. Patty's day for my cousin and her friend!


Ya like? Some were resin and glitter based, while others where a 3 stage casting process.

Resin Chica

Wednesday, March 10, 2010

Resin Epoxy Molds 411 the basics

Basic video describing some of the molds you can use when working with resin.

Friday, March 5, 2010

If your a momma too!

If you happen to be a momma too and are following me here on Resin Chica, you should check out my WAHM blog at Free2bMommy!

Hope you will visit!

Resin Chica

Tuesday, March 2, 2010

An easy way to sand down your resin pieces


You have created your resin pieces and pushed them out of the molds, but they are rough around the edges...literally! I have outlined below a great way to sand down your pieces to the smoothness you desire. Pics above help too!


1.) Buy a pack of mixed grit waterproof sandpaper. (You can get these at any home depot or the like)

2.) These packs have assorted grits from 220 (very fine) to 600 (ultra fine). This is the type of paper that you can use in water. Why would you want to use the sandpaper in water you ask? Using a shallow pan of water like the one above helps keep the tiny resin dust from getting in the air and into your lungs.

3.) I found that if you cut a small piece of the sandpaper and wrap it around a nail file you can maneuver it with great ease, then when you are done you can dispose of the used sand paper grit. Cutting the paper down will help you to save the areas that go unused for your next project. I have had the same pack for a while now.

4.) Try different grits and see which one give you the outcome you want. I use the 220 because I like to sand down the sides pretty good.

Resin Chica


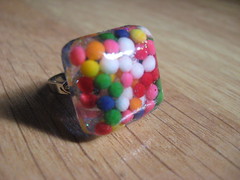
RESIN Candy Sprinkle RINGS!


Check out my newest batch of rings!!! There are many more that I am working on!
Tell me what you think!!
Resin Chica!


Sunday, February 28, 2010

Resin ring blanks

I receive my order of 50 ring blanks yesterday! I cannot begin to tell you how many resin pieces that I have completed and are waiting to be attached to the ring. The rings blanks are the jewelry piece that I get before I attach the resin pieces. I will have tons of pics soon! I have never had this many to work on at once.

I actually use resin to attach the resin piece to the ring. Unfortunately, even though resin is super strong, it does not allow the flexibility needed for an adjustable ring. I realized that the resin as the adhesive works well for attaching some pieces, but that I would need something else to attach the resin to the rings.

More on that later...

Friday, February 26, 2010

Rodeo time in Houston...


Check out my Jessica Simpson cowgirl boots! You like? The Houston Livestock and Rodeo is the largest in the world and it kicks off this weekend with the official Cookoff. The Friday before the rodeo starts is always "Go Texan" day here in Houston where we get to sport our rodeo wear to work, school, or wherever! Okay, so we Texans may still be little bit country...sure Houston is a major metropolitan city, but we have not lost the Texas twang completely! Those of us that are native Texans...never will! I will post the pics soon! Yeehaw yall!

And the winner is...

PiinkCupcakez blogger!!!
Sorry it took me so long to announce! I had to restart my computer!! URGH!!
The winner will receive a handmade resin adjustable band ring made with epoxy resin and real candy sprinkles with an overcoat of super fine glitter!
I will make contact with the winner! I will also announce next weeks "follower" giveaway this weekend!! Stay tuned! Thanks to everyone!
Resin Chica

Thursday, February 25, 2010

Totally unrelated to resin post - Tattoo Inspired Makeup - Kat Von D Promotes Badass Cosmetics For Sephora


Tattoo Inspired Makeup - Kat Von D Promotes Badass Cosmetics For Sephora

This week's Resin Giveaway!


Check out this ring! It is one of my favorite in this collection and there are more to come! All you have to do is be a blog "follower" to qualify for this week's giveaway! The winner will be selected at random and announced tomorrow at 10am central time!

I am going to try to announce the next giveaway this weekend! Stay tuned!

Good Luck!

Resin Chica

Wednesday, February 24, 2010

Want to win this ring?


Resin Chica will be doing a random drawing on Friday 2/27 for one lucky winner to receive this hand made resin REAL CANDY sprinkle glitter ring with adjustable band! All you have to do is be a Resin Chica blog "follower" to be eligible. As you can see we do not have millions of followers, so your chances are really good! What do you have to loose?! Plus if you are into crafts and similar projects you will get tons of great info on resin casting and other current craft trends. Become a Resin Chica follower today! Winner will be announced on Friday morning at 10am!!


Resin Chica

The completely unrelated to resin post

I love sharing awesome creations from fellow etsy artists.

Check out this super cute pouch, that you can use for just about anything! It's brought to us by the hands of TheMistfitOwl on etsy! I love this one because of the cupcakes! Check it!


Resin Chica

Casting resin the ice resin way!


I usually write about casting epoxy resin. Lately, I have been seeing a whole lot about Ice Resin, so I decided to do a Resin Chica 101 and bring the info to you!

Ice resin- is a clear resin that is also used for projects involving jewelry and paper.

What makes this resin different from the easy cast resin that I use for my projects? I honestly have not noticed very many differences and my research has indicated the same. The conclusion I draw is that it is a matter of preference, but I am leaning toward the difference being the "ice" like texture and look of the ice resin. Hence "Ice" in ice resin. I have also heard that it may be less odorous and not as harmful of a chemical, but don't quote me.

I am going to be working on a project using ice resin soon and I will tell you first hand what differences I notice right off the back.

In the meantime, check out the mother of all information for ice resin- http://www.iceresin.com/ for more info and cool picks as to what you can do with resin casting specific to ice resin. Let me know if you try it out yourself!

Resin Chica- the Resinista of Resin

Monday, February 22, 2010

I still love you!

I have been working constantly on building my writing portfolio that my crafting, has taken a back seat for the past week. I ordered 50 ring backs for an entire batch of awesome rings to attach. I will take pics and share as soon as I get on it. I will have much more time on my hands really soon!

Resin Chica!

Tuesday, February 16, 2010

my second love


Picture 032
Originally uploaded by ResinChica
Do you like? Let me know what you think!

--Resin Chica

Ice resin! Last time!

I keep goofing this post up! Check out this video of working with Ice Resin! If you have worked with this before, please comment and share what you did. I would love to learn more!

--Resin Chica

http://www.youtube.com/watch?v=0AJ4vIptOQA

Monday, February 15, 2010

Makes you want to lick your fingers...but don't!!


Pretty and shiney! I love the colors in this picture! I incorporated all of my favorites with this set of rings (they are attached to adjustable rings). This was a three stage curing process...yes lots of patience is necessary! Click on the pic if your are interested in having one on your finger! Please don't eat it! No matter how yummy they look!


--Resin Chica

Naked pictures in your window!

Love this! Super cute! It's a little out of my crafting league, but a great post non the least.

Check it out!

You can't eat them!

Check out my recent work. I just starting selling on etsy, so I have not had the opportunity to develop a reputation online or accumulate feedback. Either way, I love um!

SprinkleRings by Resin Chica!

Sunday, February 14, 2010

Valentines day love!


Happy Valentines Day!!


Lub- Resin Chica

Saturday, February 13, 2010

My resin casting in process!


This is a picture from my latest project of resin candy sprinkle rings (blurry due to taken with phone)! The pieces have already been cured once, this photo was taken once I poped the pieces out and filled the backs with more resin mixed with glitter for a layering effect. I balance them on the same mold I used to make them...seems to work alright.
Soooo cute you will want to eat them! (please do not attempt!!) I am taking the remaining pics that I plan to post on etsy before the weekend is over! These are some of the best ones yet! When you are working with resin you will quickly see how much your technique will improve with the more and more you cast. You will pick up your own style to prevent spills, get rid of bubbles, and create even more beautiful pieces. Dont get frustrated if your first cast is a disaster! My first time casting resin, I waisted all of the resin because I mixed way more then I needed. Just stick with it and you too, will have some pretty awesome outcomes when you least expect it!


Hugs, kisses, and resin!

--Resin Chica